
The first time you look at a Tokyo subway map, you might wonder how anyone manages to get around. There are lines crossing everywhere, unfamiliar station names and more colours than you expected.
Well, even as a Japanese person, I understand that feeling. Being able to read Japanese doesn’t magically tell you which platform to use!
The good news is that you don’t need to memorise the map. Once you understand how to check your route, find the right platform and choose your exit, getting around becomes much easier.
Here’s what I’d want you to know before your first Tokyo subway journey.
First, Tokyo Metro isn’t every train in Tokyo
You’ll probably use several railway companies during your trip. These are the main names to recognise:
Tokyo Metro is one of Tokyo’s two subway operators.
Toei Subway is the other subway operator. You might use both during your sightseeing.
JR is a separate railway network, including the popular Yamanote Line.
A station can serve more than one company, so finding the station name is only the first step. You also need to find the entrance and platform for your particular line.
This matters when buying a pass, too. A ticket covering the subway won’t automatically cover JR trains.
Check your route before entering the station
Personally, I’d check the journey on my phone before heading underground. It gives you a moment to work out where you’re going without standing in the middle of a busy passageway.
Look for:
- Your departure and arrival stations.
- The railway company and line.
- The train’s direction or destination.
- Any transfers.
- The suggested exit, if one is shown.
You can also use the official Tokyo Metro route search and subway map.
A screenshot of the journey can be handy. I’d save the hotel address as well, especially on arrival day when you’re tired and carrying luggage.
Choose how you’ll pay
There are a few ways to pay for your journeys. The best choice depends on how you plan to explore.
Suica or PASMO
These are rechargeable IC cards. For ordinary pay-as-you-go travel, you tap at the gate when entering and again when leaving, and the fare is deducted from your balance.
They’re useful when your plans include different participating railway companies. Keep enough money on the card for your journeys.
Individual tickets
You can buy a ticket at a station machine. Tokyo Metro machines offer an English-language option, so you don’t need to navigate the whole process in Japanese.
If you use a paper ticket, collect it after entering the gate—you’ll need it when leaving.
Tokyo Subway Ticket
If you plan to make several subway journeys, it’s worth checking the Tokyo Subway Ticket.
It covers Tokyo Metro and Toei Subway for 24, 48 or 72 consecutive hours from the start of use.
I’ll explain how to decide whether it suits your trip below.
Follow the line colour, letter and station number
One helpful thing about the subway is that you don’t have to rely entirely on Japanese station names.
Signs use line colours, letters and station numbers. Matching those details with your route can make the station feel much less confusing.
Once you’ve found the line, check the direction shown on the platform signs. The right line can still take you the wrong way!
Give yourself a little time to look around before boarding. You don’t need to follow everyone else simply because they seem to know where they’re going.
Getting through the gates and onto the train
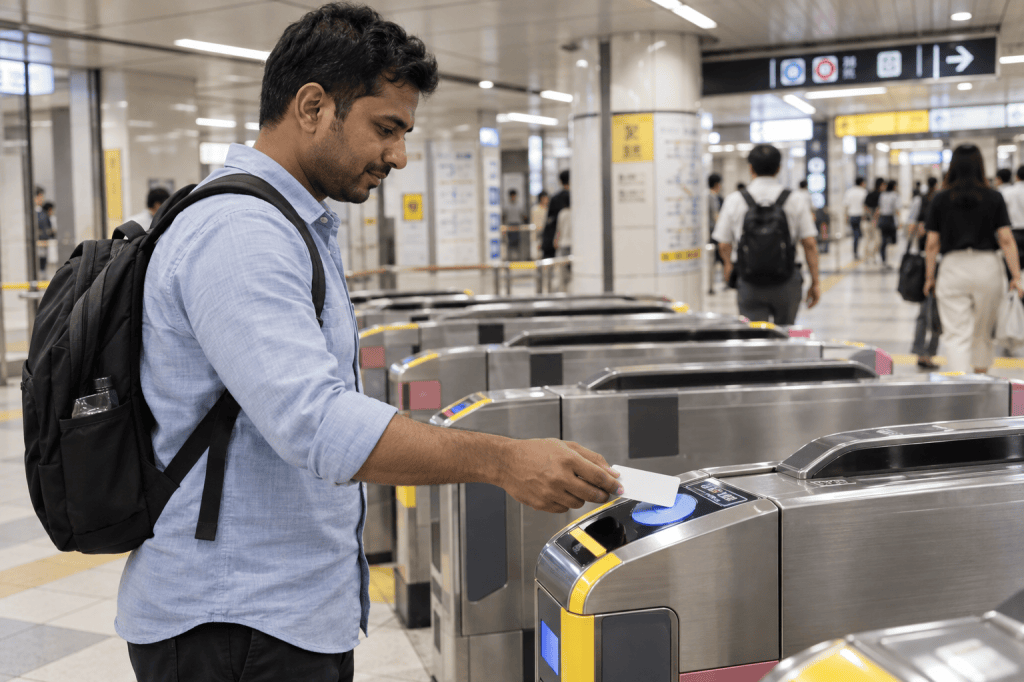
Tap your IC card at the gate when entering and leaving
With an IC card, touch it to the IC reader and wait for the gate to open. With a paper ticket, use a gate that accepts tickets, insert it and collect it on the other side.
QR tickets work differently, so follow your ticket instructions and look for a compatible reader.
If the gate doesn’t open, move aside and ask station staff for help. It’s much easier than trying repeatedly while a queue forms behind you.
On the platform, stay behind the safety markings and let passengers off before boarding.
Take your time when changing trains
A transfer can involve a walk through the station. Sometimes that walk is longer than you imagined when you saw the route on your phone.
Follow signs for the next line and check its direction again when you reach the platform.
Don’t automatically head towards the street exit. Look for the transfer instructions for your particular journey.
If you’re travelling with children or luggage, allow extra time. A route with one fewer transfer may feel much easier, even if the journey takes a few minutes longer.
Your exit matters more than you might think

Your exit matters more than you might think
This is the detail I’d especially like you to remember: check the exit.
You can arrive at the correct station and still come out on the wrong side for your destination.
After getting off, look for the exit number and the nearby landmarks listed on the signs. Yellow signs generally guide you towards exits.
If you need an elevator, check the station layout beforehand. The closest exit to your destination may involve stairs, so the most convenient route can be different when you have a stroller or suitcase.
Those few minutes of checking can save you an unnecessary walk above ground.
Is the Tokyo Subway Ticket worth buying?
It can be a good option if you’re planning to explore several neighbourhoods using Tokyo Metro and Toei Subway.
24-hour ticket: A useful option when your subway journeys fit within one continuous 24-hour period.
48-hour ticket: Worth considering if you’ll use the subway across two consecutive days.
72-hour ticket: An option for three consecutive days of subway sightseeing.
The hours run continuously. A 72-hour ticket isn’t three separate days that you can spread across a week.
Before buying, check your planned routes and compare their fares with the current ticket price. If you’re mostly walking or using JR, paying for each journey may suit you better.
Also remember that the subway ticket doesn’t cover the JR Yamanote Line or the full journey from Narita or Haneda Airport. Other railway sections need separate payment, even when a train continues beyond the covered subway network.
You can browse the available options here:
Check Tokyo Subway Ticket Options on KKday
How to use a ticket booked through KKday
Read the instructions for the package you select before travelling.
Some bookings require you to exchange a voucher for a physical ticket at a designated machine. Others offer a QR ticket for use at compatible gates.
A booking QR code and a gate-entry QR ticket aren’t necessarily the same thing, so check whether your voucher needs exchanging.
If an exchange is required, check the redemption locations in advance. Not every machine can do it.
I’d sort this out before the first sightseeing journey, rather than discover it when everyone is ready to board.
A few small habits make the journey easier
Keep conversations quiet and avoid phone calls on the train. Keep bags close to you and leave the doors clear.
If you have flexibility, travelling outside the busiest commuting periods can make the journey more comfortable.
For a late evening out, check the last available journey back to your accommodation. Don’t assume there will be a train whenever you decide to leave.
And if you’re unsure, ask. You can show station staff the destination on your phone without having to explain everything in Japanese.
Having mobile data helps
You’ll probably use your phone for more than the train timetable: finding an entrance, checking the hotel address or deciding where to eat after arriving.
It’s worth arranging your internet connection before the trip and checking that your phone supports your chosen option.
If you’re considering an eSIM, you can browse this Japan travel option:
Check Japan eSIM Options on KKday
Check device compatibility and the selected plan’s conditions before purchasing.
You’ll get more comfortable with each journey
Your first trip might involve stopping to check a sign, looking at your phone twice and wondering whether you’re heading towards the right platform.
That’s fine. Give yourself time.
After a few journeys, you’ll start recognising the colours, station numbers and the signs you need. That complicated map becomes a collection of individual trips you know how to make.
And then you can spend more time deciding what to explore—and what to eat when you get there.
This post contains affiliate links. If you book through them, I may earn a commission at no extra cost to you.


Leave a comment